Dear friends,
We have an announcement today. For some time we have had discussions about the future of &Stitches. Short term and long term. But all the while ignoring the stumpwork elephant in the room.
Neither Nicole, Julie or I currently have the time or focus to properly devote to &Stitches to make it the awesome blog we want it to be. Other commitments and life in general have come in the way. And we can hardly demand more of the rest of the team than we do of ourselves.
So we have decided to no longer post on the blog. The archive of posts will remain, of course.
We know it's quite the bombshell to stop the blog. But when we finally faced the realities of the time we're (un)able to devote to &Stitches, it was also with a sense of relief to make the decision. Albeit not an easy one.
Although &Stitches is a blog, we feel that it is more than just that. It's a community of people who love stitchy things.
We want to thank you, old and new readers, for following &Stitches. For your comments, your emails, for volunteering in Summer Bloggin'. Thank you for sharing your creativity when taking part in stitchalongs and competitions. It literally wouldn't have been the same without you.
Big stitchy hugs from
Nicole, Julie, Carina &
Aimee, Cate, Christine, Rebecca and Sophie.
What are you stitching? Please share in the &Stitches Flickr group. We'd love to see it!

Monday, March 7, 2016
Wednesday, March 2, 2016
Inspiration- Rachel Welsby

Today I'm sharing work by one of my current embroidery crushes. Rachel Welsby makes tattoo inspired embroidery art. Her themes include traditional-style tattoo imagery and more ecletic motifs such as crystal balls and esoteric symbols
Her work manages to be simple in design but still full of beautiful detail. It has definitely got me wanting to try stitching in white on black. Rachel is multi-skilled, not only is she handy with a needle and thread she is also a tattoo apprentice with some very cool designs for tattoos.

If you would like to check out more of Rachel's artwork- including her gorgeous tattoo flash please visit her on Instagram at @rachel.welsby (if you are quick you can catch a giveaway she has on!) and the pieces featured here are available on her Etsy


What are you stitching? Please share in the &Stitches Flickr group. We'd love to see it!
Sunday, February 28, 2016
Stitchy Crush: Sulky Sticky Fabri-Solvy
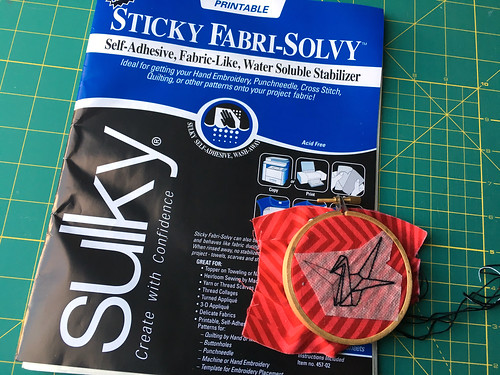
Whenever I post a photo on Instagram of the crane embroideries I'm working on, someone inevitably asks me what the white stuff on my fabric is. I always end up gushing over how much I love it, it's called Sulky Sticky-Fabri Solvy. I first learned about it from a post by Wendi at Shiny Happy World, and once I tried it, I never looked back.
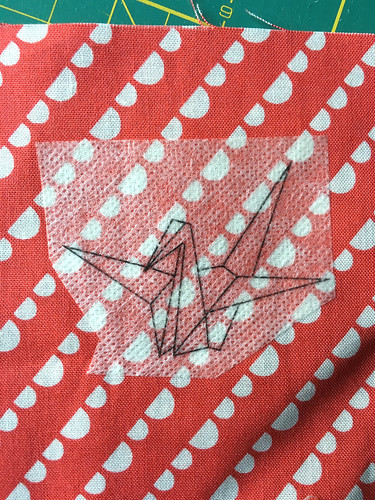
You can either buy it in printer sized sheets or on a roll and you can draw or trace a design onto it or print directly onto it. For the cranes I print a sheet with about 20 cranes and cut them out. I love using it because I need so many of the same pattern, drawing them all out would be tedious. But it's also fantastic for using on a dark fabric or something that would normally be hard to trace or mark on. It also works great for felt.
Once you're done you soak it in water and it just dissolves away, it's amazing.
Have you tried Sulky Sticky Fabri-Solvy?
Saturday, February 27, 2016
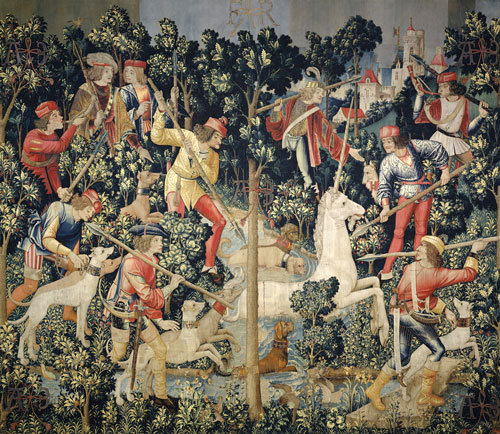
Stitchy Crush: Unicorn Tapestries
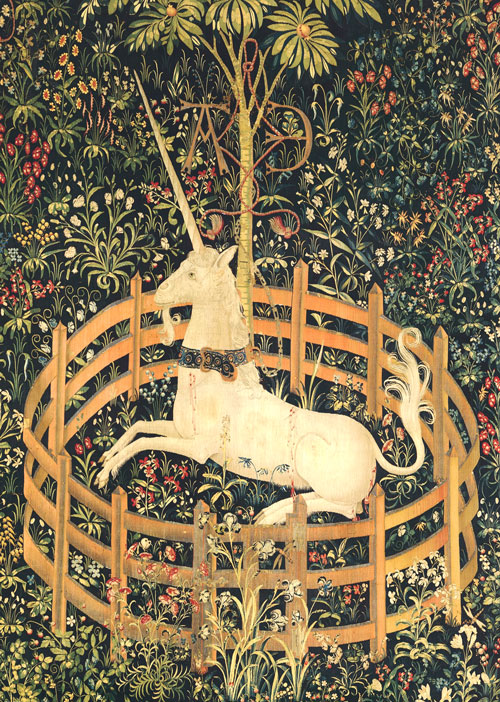
When we first started chatting about the topic of stitchy crushes, my mind immediately went to some of the really classic stitching that first got me into the world of fiber arts. I've always loved Medieval art and unicorns, so when I first found out about the Unicorn Tapestries, I was so intrigued.
These are not actually embroideries but are instead created on a loom, where the fabric itself is created from the image rather than having the image stitched into existing fabric. You can read a bit about that process over here.
I've never had the chance to see these tapestries, which are located in New York, but I have seen many others created in a similar manner, and they are truly stunning. I can only imagine the amount of work that went into spinning the threads, dyeing the fibers (all with natural dyes, of course), planning the image, and weaving it all together. Modern tapestries of this size are made by machine and still take days to weave, so you can get an idea of how many hours went into each of these pieces.
From the moment I saw these tapestries, my mind was on a slippery slope into the realm of fiber arts, and I've enjoyed every moment of it. Perhaps someday I'll attempt something this grand.
Where is your stitchy inspiration leading you? Please share in the &Stitches Flickr group. We'd love to see it!
Thursday, February 25, 2016
Stitchy Crush: Coloris from DMC
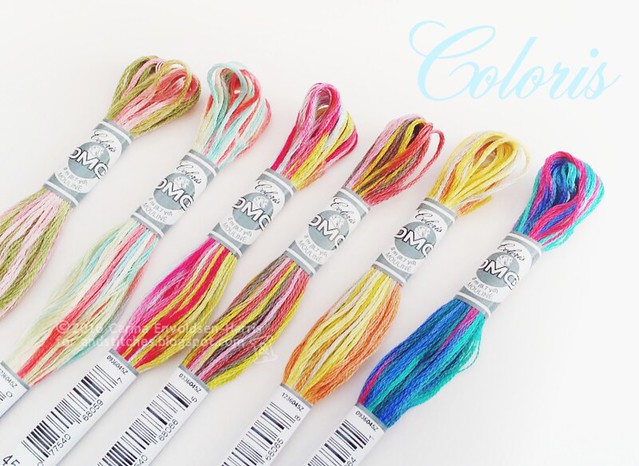
My turn with a Stitchy Crush! The Coloris range of floss from DMC. I first saw them mentioned a few months ago on the Spanish DMC blog and I was instantly smitten. Ever since I've been wondering (and regularly Googling!) if they would be available in the UK. And now they are! I found them on Sew & So, but they're available elsewhere too.
The Coloris floss is kinda like variegated floss, it changes colour. But unlike the regular variegated, Coloris isn't a gradual change between similar colours or shades on one colour.
No, Coloris changes between different colours! How cool is that? You can see from my photo that there's lots of colours in the same skein - I think the colour changes every five centimetres (2") or so. I think this is so inspiring. So much fun! So beautiful.
And even the names are fabulously evocative: Fleur des champs, Camélia, Côte de granit, Nuit canadienne, Vent du nord, Primavera and more. You can see more about the Coloris colours on the French DMC site. Be sure to scroll down the page to see the gallery with stitched samples of each colour.
I haven't decided on a project for these yet, I've only done a little test with blackwork. But I think it would definitely be great for blackwork. The changing colours would give a completely different feel to that kind of embroidery. :-)
What would you stitch with these fabulous colours?
Subscribe to:
Posts (Atom)